
How a Plastic Cap Is Injection Molded, Step by Step
How a plastic bottle cap goes from plastic granules to a finished cap in an injection mould — the whole cycle in plain language, with footage from real cap moulds running.
What is plastic cap injection molding? Plastic cap injection molding is the process that makes bottle caps: plastic granules (usually PP) are melted, injected into a multi-cavity steel mould, cooled until solid, and the finished caps are released and taken out. The cycle repeats automatically, around the clock.
Key takeaways
- A cap cycle has seven steps: melt, close and clamp, inject, hold and cool, open and release, take out, collect and pack.
- A cap mould has several cavities: our flip cap drawings show 8 cavities for a 200 ml cap and 6 cavities for a 400 ml cap.
- Cooling is normally the longest part of the cycle; on a flip top cap, the hinge sets the cooling.
- A screw cap is usually unscrewed from its core; a flip top is molded open and its lid is closed in-line.
- Whether a cap is good is decided when the cavity, the thread shape and the shut-off faces are cut.
 Watch: the process running
What you will see: the mould opening, a robot taking out a row of flip top caps and setting them on a conveyor, and the lids being closed in-line as the caps travel along it.
This page explains how plastic caps are injection molded and what decides whether a cap is good. If you are choosing a machine and mould for caps, the last section shows how the two are matched. AMAN cuts cap moulds in its own workshop and supplies the injection molding machines they run on. We have done this since 2007.
The seven steps of the cap molding cycle

Figure 1. The cap molding cycle.
1. Melt the granules. The screw turns granules into one uniform melt. Plastic granules (PP is the usual material for caps) fall from the hopper into a heated barrel. A rotating screw carries them forward, and the heat of the barrel plus the shear (the rubbing and squeezing) of the screw melt them into a uniform melt in front of the screw tip.
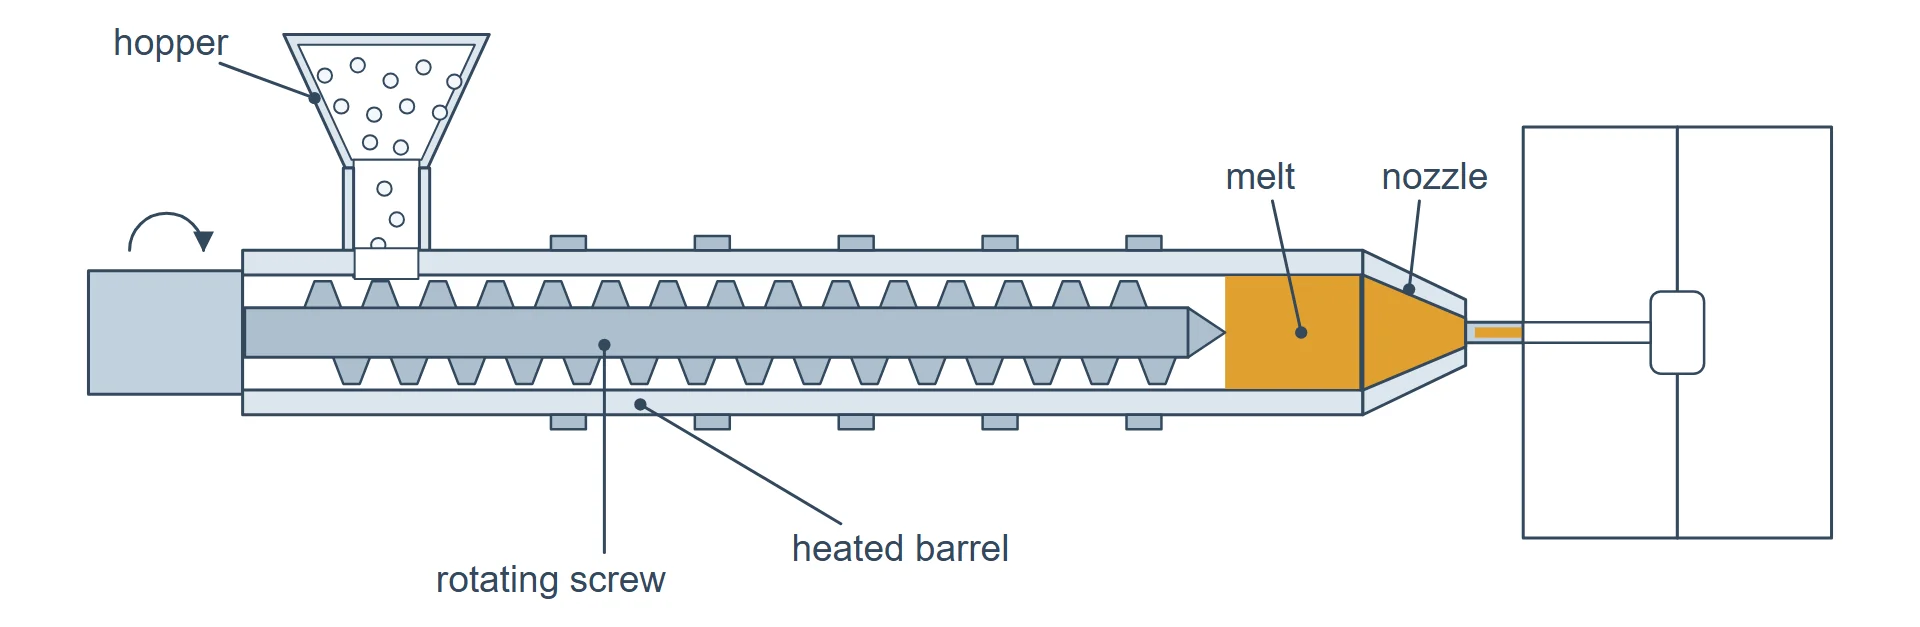
Figure 2. Step 1: hopper, heated barrel and rotating screw.
2. Close and clamp the mould. The clamp has to hold harder than the melt pushes outward. The two mould halves close and the clamping unit holds them shut. If it does not, melt leaks out between the mould halves (this leak is called flash), so the clamping force (in tons) is what decides the machine size.

Figure 3. Steps 2 to 5: the mould closes, fills, cools and opens; the ejector pushes the caps off the core.
3. Inject into every cavity. The melt fills all the cavities at once. The screw pushes forward and drives the melt through the runner system (the channels that feed each cavity) into all the cavities at once. A cap mould has several: for example, our drawings show an 8-cavity tool for a 200 ml flip cap (PP, 7.5 ± 1 g per cap) and a 6-cavity tool on a 450 × 450 mm plate for a 400 ml flip cap (PP, 12 ± 1 g). A hot runner keeps the melt heated all the way to the cavities, so it reaches every cavity evenly and there is no cold-runner scrap.

Figure 4. Step 3: cold runner and hot runner (schematic; not a real mould layout).
| Cold runner | Hot runner | |
|---|---|---|
| What happens to the melt in the runner | It cools and becomes scrap | It stays heated all the way to the cavities |
| Typical use | A small tool, with few cavities | Eight cavities and up, where the hinge has to fill the same way in every cavity |
| Scrap | Cold-runner scrap | None from the runner |
4. Hold and cool. Cooling is normally the longest part of the cycle. The screw keeps pressure on the melt while the cap solidifies, to make up for shrinkage, and water channels in the mould carry the heat away. On a flip top cap the hinge sets the cooling: how the tool is cooled decides whether the hinge sets the same way in every cavity.
5. Open and release the cap. A screw cap is usually unscrewed from its core. The mould opens and the caps are pushed off the cores. A screw cap is usually different: its thread would lock it on the core, so the tool unscrews the cap as it releases it — in the footage below, an unscrewing mould turns the cores, with a hydraulic motor on the tool, to free eight caps at a time.
 Watch the footage
Footage: the unscrewing mould. The cores turn, driven by a hydraulic motor on the tool, and free eight caps at a time.

Figure 5. Step 5: the core turns and the cap comes off.
6. Take out and, for a flip top, close the lid. A robot lifts the caps out and sets them on a conveyor. A flip top cap is molded with its lid open; on our footage the lids are closed in-line on the conveyor, so the cap leaves the machine ready to pack.
 Watch the footage
Footage: a robot lifts the caps out and sets them on a conveyor.
7. Collect and pack. The caps drop into a bin or carton and the cycle repeats. The cycle runs automatically, around the clock.
What decides whether a cap is good
A cap mould is judged on three things: whether the closure seals on the neck it has to seal on, whether every cavity gives the same cap, and whether it keeps doing both once the machine runs fast. All three are decided when the cavity, the thread shape and the shut-off faces (the faces where the two mould halves press together) are cut to the drawing. That is why AMAN cuts the cavities in its own workshop in Jiangsu, runs the tool on a machine there, and ships the trial caps with it.

Figure 6. 'Seals on the neck' means the thread and the sealing surface fit the bottle neck.
Different caps, different tools
| Cap | What the tool has to do | See the tool |
|---|---|---|
| Screw cap | Form the thread and release it — the cap is unscrewed or stripped off the core, depending on the thread | Screw cap moulds |
| Flip top cap | Mould lid and base on one hinge so the lid still snaps shut after many openings | Flip top cap moulds |
| Two colour cap | Mould two colours in two shots and line them up exactly | Two colour cap moulds |
| Measuring cap | Mould the graduations (the measuring marks) into the tool, so they are part of the cap | Measuring cup moulds |
Machine and mould as one set
AMAN supplies plastic cap injection molding machines with the matching cap mould cut in-house: our page lists 16 machines, including a 16-cavity PCO 1880-1881 cap injection molding machine. The mould takes 40–60 days from approved drawings; machine and mould ship as one set, tested and tuned together, with the trial caps. Send your cap drawing and we quote the machine together with the mould.
A real example
A closures maker in Pakistan needed two-colour threaded caps matched to its bottles. The moulds were multi-cavity with hot runners, so the melt stays balanced across the cavities and the cavities stay identical. Read the case: multi-cavity two-colour and threaded cap moulds, Pakistan.
FAQ
How are bottle caps made?
Plastic bottle caps are made by injection molding: plastic granules, usually PP, are melted in a heated barrel, injected into a multi-cavity steel mould and cooled until solid, then the mould opens and the finished caps are pushed off the cores and taken out. The cycle has seven steps and repeats automatically. Send us your cap drawing and we quote the machine and the mould together.
Cap injection molding process steps
Cap injection molding has seven steps: (1) melt the granules, (2) close and clamp the mould, (3) inject into every cavity, (4) hold and cool, (5) open and release the caps, (6) take them out and, for a flip top, close the lid, (7) collect and pack. Cooling is normally the longest step, and the cycle then repeats automatically.
How is a screw cap taken out of the mould?
A screw cap is usually taken out by unscrewing it from the core, because its thread would otherwise lock it on. In the unscrewing mould in our footage the cores turn, driven by a hydraulic motor on the tool, and free eight caps at a time. A cap without a thread is simply pushed off the core.
Cap mould cavities: how many?
The number of cavities in a cap mould is worked out from the caps per hour you need and from the machine's clamping force, not taken from a catalogue. Our flip cap drawings show 8 cavities for a 200 ml cap (PP, 7.5 ± 1 g) and 6 cavities on a 450 × 450 mm plate for a 400 ml cap (PP, 12 ± 1 g). Tell us your output and machine and we calculate it.
Hot runner or cold runner for a cap mould?
A flip top in a small cavitation tool is usually cold runner, and a tool with eight cavities or more, where the hinge has to fill the same way in every cavity, usually goes hot runner. A hot runner keeps the melt heated all the way to the cavities, so there is no cold-runner scrap. We state the choice in the quotation, based on your part weight and cavity count.
Flip top cap mould: why is the hinge so important?
The hinge is formed by the tool, so the flip top cap mould decides whether the lid still snaps shut after many openings. The section across the hinge and the shut-off faces either side of it are cut to the drawing, and how the tool is cooled decides whether the hinge sets the same way in every cavity. We open and close the trial caps by hand before the tool is packed.
Can I buy the cap injection molding machine and the mould together?
Yes, we supply the cap injection molding machine and the matching cap mould as one set, tested and tuned together before shipment. Our machine page lists 16 cap machines, and the cap mould takes 40–60 days from approved drawings. We also cut moulds for machines you already have. Send your cap drawing and we quote the machine and mould together.
What do you need to quote a cap mould or machine?
To quote a cap mould or machine we need the cap or its drawing, the neck and thread it has to fit, the material, and the caps per hour you need; for a flip top or two colour cap, tell us that too. Send them and you get an exact quote within 24–48 hours.
Related: cap moulds · flip top cap moulds · two colour cap moulds · how an injection molding machine works
Planning a cap line?
Send your cap drawing and get an exact quote within 24–48 hours.
Browse plastic cap injection molding machines →Get a machine quote for your part
No drawing yet? Photos of a sample part work too. This is all we need to match the machine and quote it:
- ✓Part drawing, 3D file, or photos from all sides
- ✓Part size and weight
- ✓Material, e.g. PP, HDPE or PET
- ✓Pieces per hour, or the tonnage you have in mind